 |
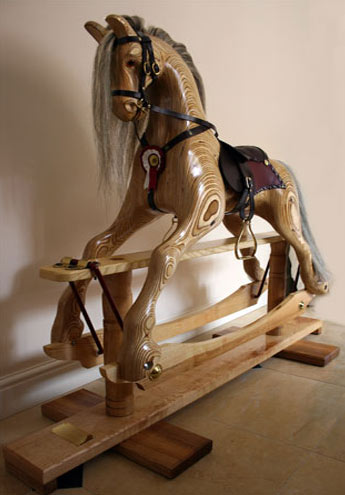
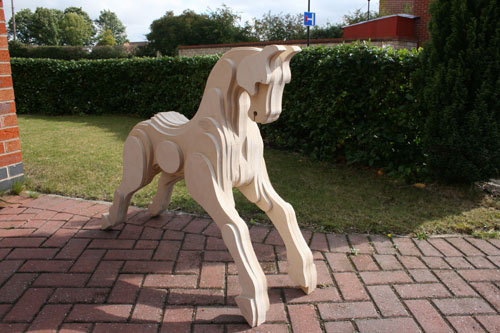
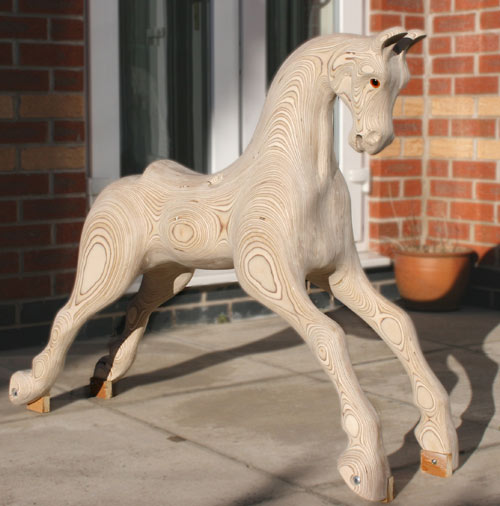
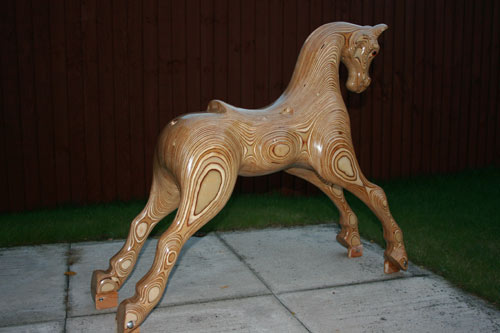
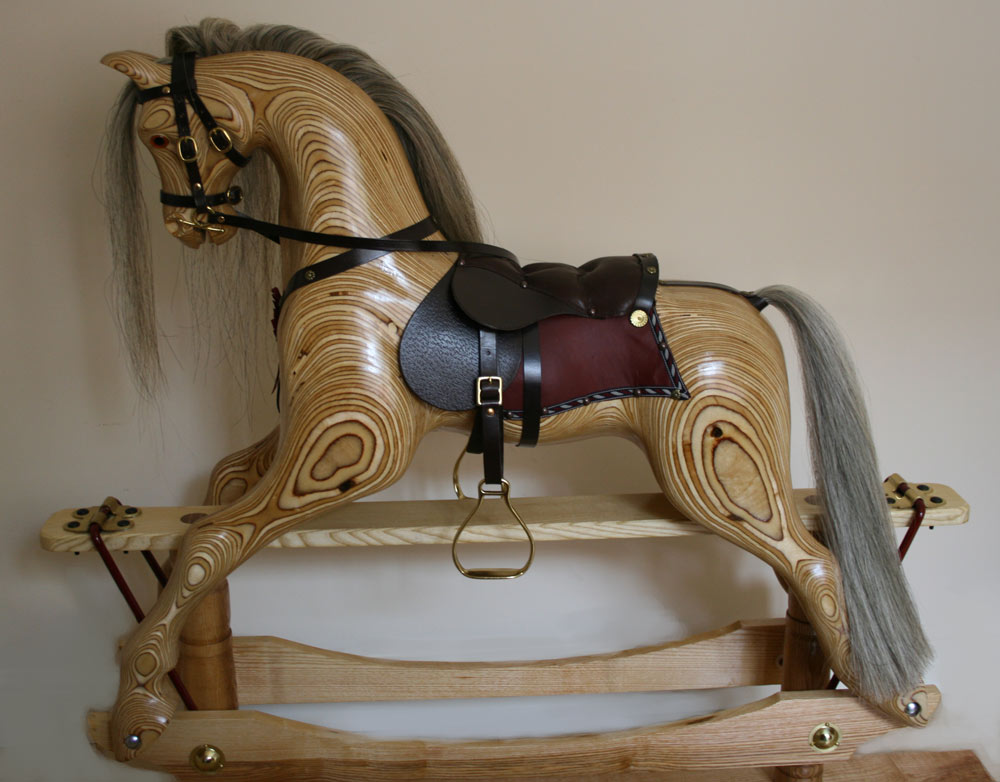
This is the horse I made for my Granddaughter Evie as a Christmas present 2010. It is the laminated horse 'Rocky' from The Rocking Horse Shop based in Fangfoss near York. This was a really interesting project to undertake and kept the neighbours amused and interested throughout. Although I have done some basic joinery and carpentry previously I had never carved anything like this before, so I knew it would be a learning experience.
Anthony Dew's plans and instructions are very clear and helpful, but there are a few tips I picked up along the way which I will share with you as we go through the process.
|
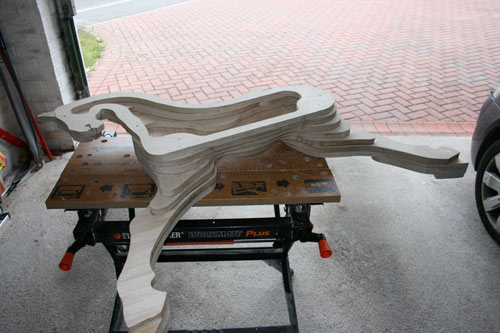 |
The horse can be cut out of a single sheet of 8' x 4' x 3/4" (2440 x 1220 x 18mm) birch plywood, or the ready cut pieces can be purchased from the company (which is what I did).
Here you can see one half of the horse glued together.
TIP If you buy the ready cut wood, consider drawing around the pieces onto some hardboard or cheap 3 ply sheet so you have a set of templates. You never know if you will want to make another horse. The ready cut wood from The Rocking Horse Shop costs about three times the price of a sheet of birch plywood.
|
 |
Don't forget to put a message (or
time capsule) inside the horse before you join the two
halves together. Hopefully no one will read it for a very
long time!
Apparently some rocking horse makers build in a small door so you can access the hollow centre. Where's the mystery in that?!
|
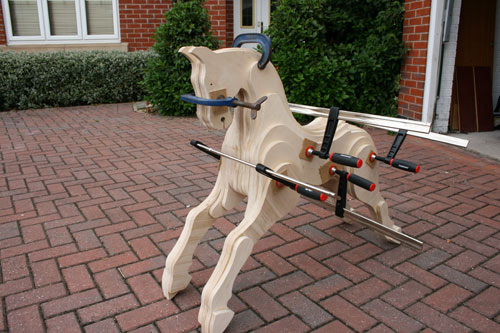 |
The recommended glue is Polymite which is a powder based resin. It is very strong and the clamps can be removed after about six hours. |
 |
Clamps removed and ready for carving.
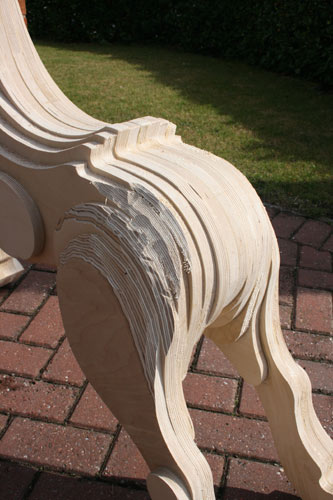
The horse can be carved with traditional tools (gouge and mallet) but some tools such as drawknife and spokeshave do not work so well on plywood. Also, gouges will blunt more quickly on plywood because of the glue between and within the laminates.
Many rocking horse makers now rely on a tool called the Arbortech. This is a wood cutting disc on a 110 or 115mm angle grinder.
|
 |
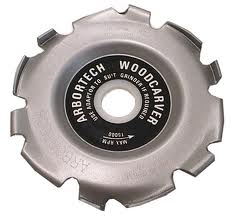
I was rather reluctant to use this tool (it looked very fierce) until I saw it demonstrated at the open weekend that The Rocking Horse Shop holds in September each year. I would really recommend this now as an essential tool for carving this project. Experienced users seem to prefer not to use the additional guard which restricts access to confined areas and limits the angle of cutting, but I would certainly recommend using the guard. Besides protecting your fingers, it controls the direction of the waste product and can also be used as a depth stop to avoid accidentally taking away too much wood. |
 |
... After a morning with the
arbortech.
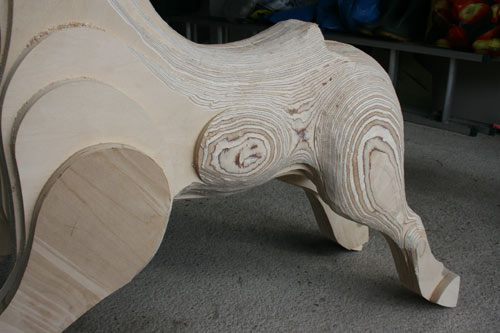
Not bad for a beginner but, talking to some pro rocking horse makers just recently who claim to be able to rough carve four or five full horses in a day, it now seems rather meagre!
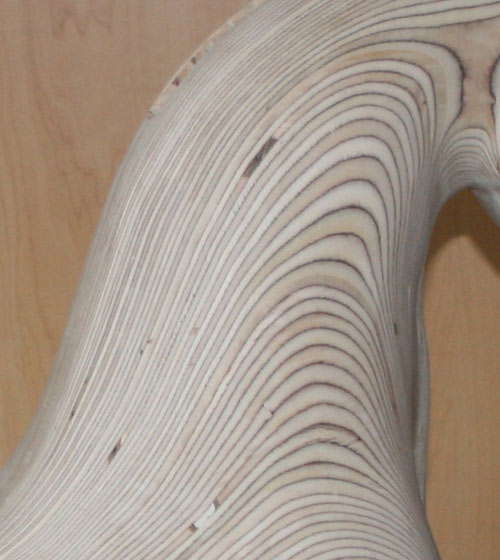
The design of this horse is so good that, essentially, all you are doing is taking the edges off each laminate layer so that they flow into each other. On the body and legs, it is very easy to sense what is needed as the contours of the laminations show you the way.
|
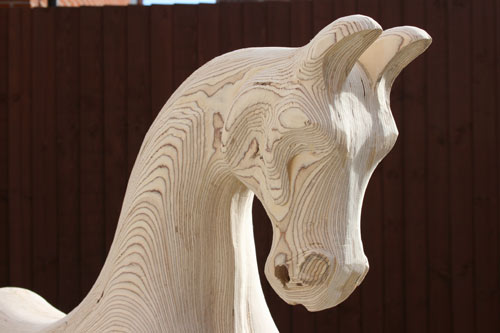 |
Carving the head is a little more difficult and was a nervous day. Make as many pencil markings as you can to 'draw' the face features on the laminates. I did use the mallet and gouge a little along with the arbortech. Just keep the symmetry in mind and take your time. |
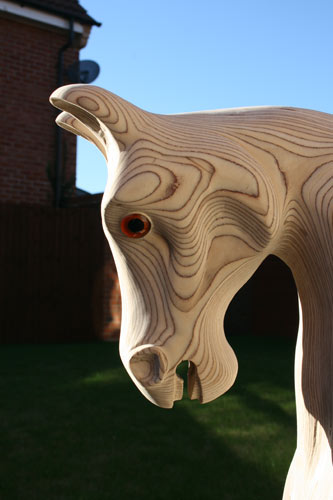 |
The eye
socket needs to be about 2mm wider than the diameter of the
eye and is centred on the dowel which runs through the head
so, unlike a solid wooden head, it's quite easy to get the
eyes level.
TIP To flatten the top of the teeth I found a loose flat surform blade really useful if you don't have other forms of very thin flat files.
|
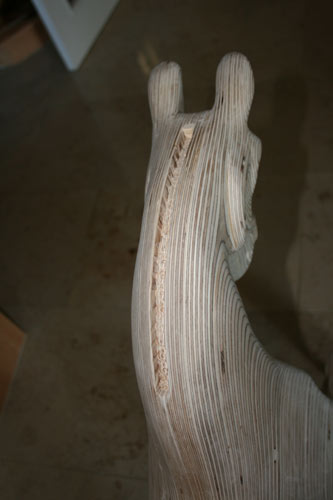 |
I made what I thought was a small
mistake when cutting the slot for the mane, which later
turned out to be beneficial.
I measured the length of the tape on which the mane hair is attached and it was 24cm. So I measured out this length on the neck for cutting the slot. The slot is cut by first drilling a series of 9mm holes to a depth of about 12mm. Not thinking what I was doing, I placed the drill centre on the end points of the 24cm length and drilled. Of course, that then gave me a slot 9mm longer than needed because I should have subtracted the diameter of the drill bit from the total length.
If you look closely at the picture you can see some wood filler near the ears which I put in to rectify the error in length.
However, when I came to actually fit the mane, the slot wasn't long enough!! That is because, with the slot being 12mm deep on a curved neck, the internal length of the slot was about 9mm shorter (basic geometry really) so I had to dig out the filler again and all was well.
So the moral and TIP is - The surface length of the slot needs to be longer than the tape by just under the depth of the cut. Placing the drill centres of the first and last holes at points equal to the length of the tape got this right for me.
|
 |
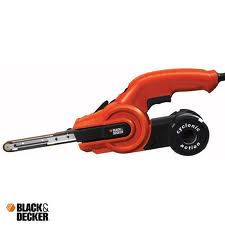 After rough carving, the surform and Black & Decker powerfile were the most useful tools I found. The power file is great for 'almost done' shaping after the arbortech in preparation for final sanding. One of the experts at The Rocking Horse Shop told me that he knew of someone who had carved the entire horse with a power file. I can see it might be possible but there would be a mountain of dust! The arbortech tends to produce very small wood chips which do not float in the air as dust does. |
 |
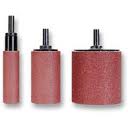 After the power file I sanded the horse using flat 180 grade paper, but mostly with a 50mm Carroll drum sander - another invaluable tool. This gave a really smooth finish with 120 and 180 paper. The 25mm drum would have been useful in more confined areas, but since each drum retails at about £25 I didn't think the expense was justified. The 50mm is a good compromise for all-over work.
The sanding alone took me a full day. It's not worth skimping on this bit. There are inevitably small imperfections in the layers of the plywood and these should be filled with wood filler prior to the final sanding. |
 |
I finished the horse with Danish Oil. It is probably more usual to use polyurethane varnish but the Danish Oil is easier to apply, does not bubble up and looks very smooth and silky. I applied it with a foam brush using 4 coats. After the first coat the horse looked terrible since much of it is absorbed leaving a messy and blotchy finish. Each subsequent coat improved matters. I lightly sanded the horse between coats, vacuumed the dust off and rubbed it over with a tack cloth. |
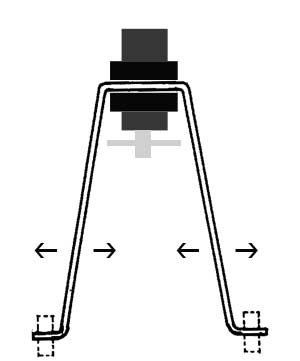 |
Once you have finished the horse and
built the safety stand, all your great work will be wasted
if the horse doesn't rock properly. Here are a few points I
found helped to ensure free rocking.
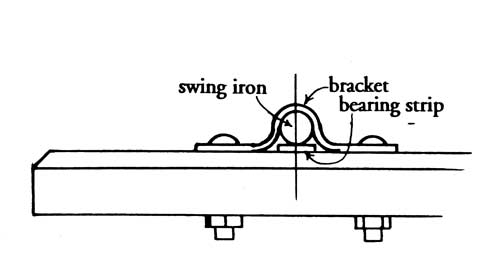
TIP When you adjust the width of the swing irons to match the horses legs (all described in the plans), you will produce a better result if you grip the top bar of the swing iron in a metal vice whilst bending the lower arms in or out. Otherwise the top bar of the swing iron will become curved and not sit properly on the bearing strip.
|
 |
If the amount
of adjustment is large, you may also need to make sure the
outer projections of the swing iron (the bits that go
through the hoof rail) are still horizontal. If not, grip
the lower part of a long side of the swing arm in the vice
and tap the short projection until it is back in line with
the top bar.
|
|
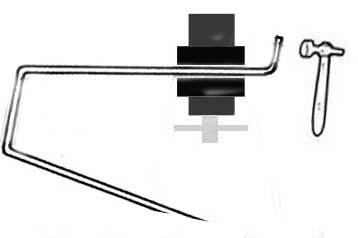
Talking to other makers, it seems the
brass (or steel) brackets that hold the swing irons are
sometimes too 'flat' and would bind on the top bar of the
swing iron. Again using the vice to just lift the centre a
very small amount will allow the irons to swing much more
freely. Always protect the bracket by wrapping it in cloth
before gripping in the vice or tapping with a hammer or
mallet.
The bearing area needs some lubrication of course, and a small amount of vaseline is probably the safest substance to use with young children nearby.
|
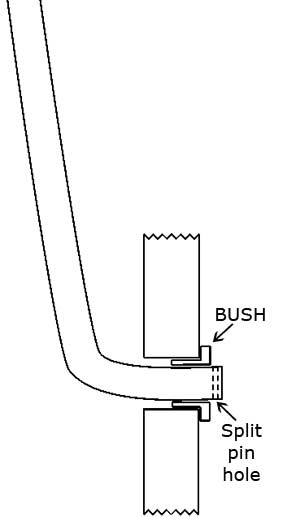 |
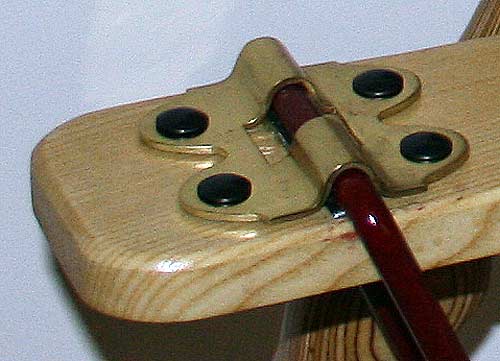
Different professional rocking horse
makers also had varying views about whether or not to put
bushes in the Hoof rails. After trying out the swing on
their horses it did seem that those without bushes had a
freer swing. I wanted to use bushes on the grounds that it
is easier to replace worn out bushes than a rail with an
oversized hole (even though some say this is not likely with
normal use). I initially put a bush on both sides of each
hoof rail but was not happy with the swing. I ended up with
a single bush on the outside only (as shown in the diagram)
and that seems to swing well. If the bush has an outer
flange as shown here, don't use a metal washer as well
before putting in the split pin or the pin and the tip of
the swing iron will probably rub on the inside of the bowler
hat cover.
The result is that, if I raise one end of the horse so that the swing iron is in line with the top rail and then release it, the horse will swing about 18 times (counting forward and backward as two swings) before coming to complete rest. When both bushes were in it would only do about 6 to 8.
|
|
|
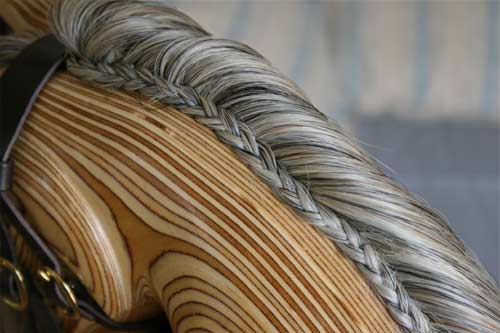
TIP Taking a few strands of hair from under the bridle top near the ears and plaiting them gives an effective finish to the mane, and hides the rather abrupt effect of the hair just disappearing into the neck. The plait is held in place with U shaped staples buried beneath the plait. (These must be securely hammered into solid wood.) .
|
| There are few things more satisfying
than seeing a project like this come to fruition and seeing
the horse rock for the first time. I am already looking
forward to making my next one. So, if you like the idea of
owning a beautiful rocking horse such as this but don't
fancy the idea of making it, by all means get in touch and I
might be able to help!
|
EVIE'S FIRST ROCK
|
